Introduction
GitHub Link: https://github.com/huderlem/contest-painting-effects
In the Game Boy Advance games Pokémon Emerald, Ruby, and Sapphire, the player may compete in special competitions called “Contests”. If the player performs well enough, an NPC will kindly paint a portrait of the Pokémon and display it in the Lilycove Museum. The player can view this painting, and depending on which type of Contest it was, a different image processing effect is used on the Pokémon’s portrait.
I was interested in how these image processing effects worked under the hood. As a result, I wrote an image processing library in Go which perfectly recreates each of the five effects.
The original image processing code is documented in the pokeemerald decompilation project.
Examples of the five in-game portraits are shown below.
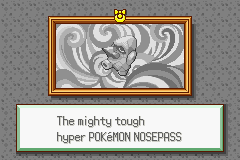
Tough Portrait
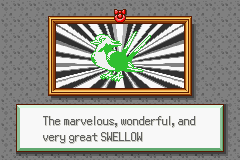
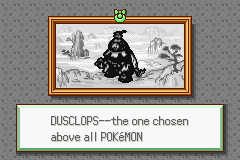
Cool Portrait
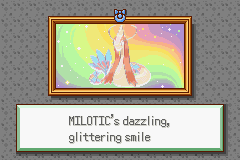
Beauty Portrait
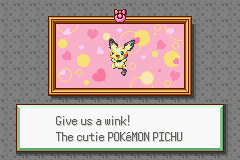
Cute Portrait
Smart Portrait
Effects
Most of the effects are combinations of simpler effects. When combined, they produce a more visually-appealing complex effect. Let’s go over how most of these effects are applied at the code level.
First, the mon’s sprite is loaded into a RAM buffer, which contains the raw 4bpp (4-bits-per-pixel) data. Next, each pixel in that buffer is replaced with its raw 15-bit RGB value. All transparent pixels are marked with a 0x8000 mask, since the 16th bit is unused for the 15-bit RGB value. At this point, we have a 2D array of RGB pixel values for the Pokémon’s sprite. Then, an effect is applied on each pixel individually. Next, a palette is constructed based on the transormed pixel array through a process called quantization–more details on that later. Finally, the palette and pixel array are loaded into the Game Boy Advance’s video RAM so they can be displayed on screen.
Let’s take a loook at some of the simple effects and how they are applied to each pixel of the buffer. There are some less-interesting effects that we won’t cover, such as grayscale and black/white.
Invert Color Effect
Inverting a color, also known as the “negative”, is a common image processing technique out there. A pixel’s inverted color can be calculated independently of surrounding pixels. In the context of standard 8-bit RGB values, it’s defined as follows:
inverted_red   = 255 - red
inverted_green = 255 - green
inverted_blue  = 255 - blue
Applying the invert effect to Charizard’s sprite looks like this:
Invert Color Effect
Black Outline Effect
This effect traces a small black outline around the entire Pokémon’s sprite. The way that a pixel is determined to be part of the outline depends on its surrounding pixels. A pixel is considered part of the outline if any of its adjacent pixels are transparent AND it is not transparent itself. Applying this rule to every pixel in the image produces a nice single-pixel black outline of the image boundaries.

Black Outline Effect
Blur Effect
Typically, Gaussian Blur is the standard blurring effect used in image processing. Gaussian blur is where a pixel’s new color is determined by calculating the average of its nearby pixels. The blur effect used for the contest paintings is not Gaussian blur. I like to think of it more as a smudge, than a blur. An interesting side note is that Gaussian blur requires two pixel arrays, since it needs to keep the original pixels around to perform mean calculations for other pixels. The contest painting effects only have one single pixel array, so every effect must be done in-place.
The blur effect used here is a directional blur. It is implemented in both right- and down-directions. To determine a pixel’s transformed value, do the following:
- Take the pixel and its right (or downward) neighbor pixel.
- If either of the pixels are a very bright color, don’t do any blurring.
- Find the color channel (R, G, or B) with the largest difference between the two pixels.
- Multiply the original pixel by a factor that corresponding to the large channel difference.
In the case of a right-blur, the pixels are processed left-to-right. This is important because of the in-place restrictions described earlier. When performing a down-blur, the pixels are processed top-to-bottom.
When applying this effect once or twice on an image, it gives a general blurring effect. However, applying it many times tends to greatly accentuate small hue shifts.

Blur Right Effect

Blur Down Effect
Pointillism Effect
Pointillism is a style of painting or drawing where small dots are used to create the whole image. The contest painting pointillism effect is achieved by splatting a large number of similarly-colored pixels randomly onto the image. This makes it so the original image is still discernible, but gives the impression that it was constructed by individual dots.
Rather than programmatically randomly splatting pixels onto the image, the code uses a predefined array of 3200 sets of pointillism “splats” to apply to the image. This means that the resulting image is identical every time the effect is applied–there is no randomness. Each item in the 3200 “splats” holds information about x/y coordinates, num pixels to splat, and color shifts.

Pointillism Effect
Palette Quantization
After the desired pixel effects are applied to the image, a fixed-size palette is built from the resulting image. This process is called “quantization”. There are three different palette quantizers used by the contest painting effects.
- Standard Quantization
- Grayscale Quantization
- Primary Colors Quantization (Unused in the actual in-game paintings)
Standard Palette Quantization
The standard palette quantization process is not too complicated. Simply loop over all pixels in the image, and include the unique colors in the resulting palette. The sprite used in-game is set to 8bpp-mode (8-bits-per-pixel), which allows 256 colors in the palette. If there are too many unique colors in the image, then only the first 256 are used in the final palette. Any pixels that can’t be represented in the final palette are set to a gray color. Luckily, I don’t believe this ever occurs for all possible Pokémon portraits.
As you can imagine, 256 colors is not very much for a 64x64-pixel image. To reduce the possible color count, this quantization process also clamps RGB color channels to multiples of 4, which vastly reduces the size of the color space and makes it more likely that the final image will have fewer than 256 unique colors.
Grayscale Palette Quantization
The grayscale quantization process works in the opposite direction as the standard palette quantization described above. Instead, a constant set of 32 grayscale colors are the result palette. Then, the grayscale value of each individual pixel is calculated using the mean of its RGB channels. Using that value, the pixel is assigned to one of the constant 32 grayscale colors in the palette.
Primary Colors Palette Quantization
This is a really cool palette quantizer, which is sadly unused in actual gameplay. This quantizer works similarly to the grayscale quantizer, except the constant set of colors is composed of 16 bright colors from the rainbow. Each pixel is examined at assigned to the closest color in that 16-color set. The result is that the image looks like it could be compatible with old SNES or Game Boy Color platforms. Below are some of my favorite examples where I applied this quantizer to the base image.


Primary Colors Quantization
Full Painting Effects
Now that we understand how the pixel effects and palette quantizers work, we can look at how the five different painting effects come together. Below, the pixel effects and quantizers are listed for each painting effect. Accompanying animated GIFs show how each step of the process.
Tough
Pixel Effects:
- Grayscale with subtle brightening
- Grayscale based on Red color channel, with subtle brightening
Palette Quantizer: Grayscale


Tough Effect
Cool
Pixel Effects:
- Black outline
- Personality color (Changes dark pixels to a solid color, based on the Pokémon’s personality value. Changes light pixels to white.)
Palette Quantizer: Standard


Cool Effect
Beauty
Pixel Effects:
Beauty’s pixel effects are actually all implemented as a single step, but they are logically separated as follows:
- Invert
- Blur
- Blur
- Invert
Palette Quantizer: Standard


Beauty Effect
Cute
Pixel Effects:
- Pointillism
Palette Quantizer: Standard


Cute Effect
Smart
Pixel Effects:
- Black outline
- Blur right
- Blur down
- Black and white
- Blur
- Blur
- Grayscale based on Red color channel, with subtle brightening
- Grayscale based on Red color channel, with highlight on ligher areas
Palette Quantizer: Grayscale


Smart Effect
Full Painting Collection
As a result of all of this work, I generated an archive of all possible Pokémon contest painting images. You can download the collection here: http://www.mediafire.com/file/y59hxgd4thtk6z3/contest-painting-pokemon.zip/file
Thanks for reading.