This is part 4 of a blog series where I reverse engineer a Game Boy Color game titled Looney Tunes: Carrot Crazy. It’s a rather obscure game, but I quite enjoyed it when I was a kid. For each part in this series, I will set a goal and document the steps I took to achieve that goal. An example of a goal might be to make Bugs Bunny jump twice as high. I use the trusty BGB Game Boy emulator for a lot of my work, since it has a robust debugger and memory viewer. I’ll be building up a disassembly of the game as the series goes on.
Looney Tunes: Carrot Crazy is a simple platformer. The player controls Bugs Bunny and Lola Bunny to traverse the 2D levels, while collecting carrots and other things. The first two stages in each level are similar, but the third is always a side-scroller where the boss character chases the player.
Dump sprite sheets of all entities in the game and add our own power-up carrot to the game.
Last time, we documented all of the levels in the game, so the next logical step is to reverse engineer all of the entities. “Entities” are sometimes called “actors” in game development. They are the things the player interacts with when playing the game. For example, this game has many collectibles and enemies to fight–these are both examples of entities. Simply put, entities have behavior and visual representation. We’ll want to document their behavior code and their animations.
Method
A great place to start would be to build an enumeration of all the entities in the game. Game Boy games typically have an array-like structure of entities corresponding to each game level. If we can locate that structure in the ROM, then we should have all the information we need to build an enumeration of entities. Note that unlike primitive graphics, the Game Boy hardware doesn’t have any dedicated process for handling entities–that is all implementation-specific, so each game developer handles it differently.
Once we have a complete enumeration of the entity types, we will disassemble the game logic that powers each entity. It’s a relatively safe assumption that each entity will have its own “handler” function which executes per-frame updates. For example, it might control the entity’s walking animation or grant player with points after killing it. Some entities might share logic, too.
Finally, we will dump the entity graphics and build human-friendly sprite sheets. This is nice for posterity’s sake, as well as ease-of-modification. I’m very fond of the graphics in this game. Many of the entities have lots of personality, so the final animation sprite sheets should be pleasant to look at.
Locating the Levels' Entity Definitions
In Part 3, we disassembled a good chunk of the level data structure. If you recall, it was a structure that defined the level graphics and layout, as well as the level-loader function, RunLevelScreen.
Since that was all the data necessary to complete our goals in Part 3, we stopped there. However, this data structure has more data. By looking at the size of the gap between each level’s data, there appears to be 19 more bytes in this structure. I would bet money that some entity-related data is located in those 19 bytes, so the next task is to figure out what those 19 bytes are.
We already know that RunLevelScreen processes the palette data that directly follows in the level data. Looking at its code, we observe that it calls a series of routines that all read from [hl], which is a 16-bit register that points to the level data structure. If we can determine what those routines do, we will have a better understanding of those 19 mystery bytes.
Disassembling and inspecting Func_2b6d reveals that it writes to wLevelMap, which is the level definition from Part 3. However, the first thing this funciton does is read 4 bytes from the level structure, and it copies them to to $ffa0 in RAM. When manually fiddling with these values in the BGB debugger, they seem to control the camera. What’s neat is that when these camera coordinates aren’t centered on the player, they automatically scroll to center on the player. The rest of the code in Func_2b6d seem to populate the level map. 4 mystery bytes down, 15 to go.
Func_1965 is the next function that read bytes from the level data structure. This one is a simpler function, and it copies 4 bytes to RAM address $ffc8. This is likely another coordinate-related set of values. Fiddling with the BGB debugger reveals that these are the player’s pixel coordinates within the level. Again, we observe the automatic camera-scrolling behavior when we teleport the player around. 8 mystery bytes down, 11 to go.
The third function, Func_39f1, looks promising for being related to entities. It first loads 5 bytes from the level data structure, the first of which is used to immediately load a ROM bank. Then, the code loads an array of data into RAM location $d500, starting at the address specified by bytes 4 and 5. Could this be the entity data for the level? I can’t think of any other array-like data that would be loaded for a level, so it seems likely.
Let’s dump some of that array’s data and see if we spot any patterns. Based on Func_39f1’s code, we don’t really know the size of each array entry because it blindly copies $400 bytes. I’m guess a pattern will be easy to see, though. Here is a raw dump of the first level’s mystery data, which is located at ROM address 0x15EC6.
Surprisingly, I do not spot any fixed pattern in that data. If each entry in the array were the same size, there would almost always be a visual pattern that is easy to spot, since the same types of values would occur in the same place in each entry. I do have an eye for Game Boy pointers, though, which are two-byte values whose second value is always between $40-$7F, which is a switchable bank address’s high byte. Let’s rearrange these bytes according to that rule:
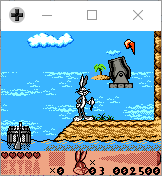
That’s more like it. A couple of patterns are immediately obvious. Entries 1 and 4 are nearly identical, and entries 2 and 3 share many of the same values. This is exactly what you could expect for entities because aspects like their pixel coordinates would differ between instances. To confirm that this is really entity data, let’s make some manual modifications to the data and see if we notice anything different in-game. Let’s start by changing $DF to $BF in that first entry. Playing through the first level, we immediately notice that there is now a floating cannon!
Floating Cannon
This confirms our conclusion that this is indeed the entity data array, and it also confirms that each entity is not fixed-width in RAM. That value we modified must have been the pixel Y coordinate of the cannon entity. Entry 1 and 4 are probably both cannon entities, since they begin with the same $12 $52 byte pair. Modifying that second entry does indeed affect the other cannon in level 1, so it’s nice to have that sanity check.
At this point, we’ve determined that the entity data is located inside those remaining 19 bytes of the level data structure. Now, we will comb through each level’s entity data and enumerate all of the entities in the game.
Enumerate and Dump Entities
How can we represent entity data in a human-friendly manner? The answer is often to create macros, which is exactly what we’ll do. Since each entity has its own length and set of parameters, we’ll create a unique macro for each entity. In the end, we hope to have laid out each level’s entity data similar to this:
Using the earlier observation about Game Boy switchable bank addresses, we should first determine what each entry’s first two bytes represent. My gut tells me there are two likely answers. They could be a pointer to the function that is responsible for the entity’s behavior, or they could be a pointer to the entity’s animation data. By disassembling the data as code, it quickly becomes obvious that it is indeed the entity’s behavior function. If it were animation data, the resulting disassembled code would be gibberish or invalid. Putting a breakpoint at the function’s address reveals that it’s called exactly once per frame for each on-screen entity. Presumably, these functions handle updating the animations along with any non-graphics-related logic.
Let’s try and build the cannon entity’s macro first. We know the first two bytes are always a pointer to the HandleCannonEntity function (address 1:5212). We also know that bytes 2-5 are the pixel coordinates of the cannon in the level. The only unknown byte is the last one. Visually inspecting the entity in RAM during gameplay reveals that it’s an animation counter which makes the cannon rotate back and forth. It’s always 0 initially, so our macro can hardcode it to 0. We are left with the following macro for the cannon entity:
; \1: x pixel coord
; \2: y pixel coord
entity_cannon: MACRO
	dw HandleCannonEntity
	dw \2, \1
	db 0
	ENDM
For example, we would write it like this in our actual game code:
After repeating this process for every single entity in the game, we are left with 82 unique entities. Some are very simple like the cannon, but others are complex and involve things such as min and max walking coordinates. At this point, we’ve disassembled all of the entity behavior functions, too.
Dump Entity Metasprites
Now comes the fun part–building beautiful sprite sheets so we can view the entity animations in all their glory. Simply by observing gameplay, we notice that the sprites in this game are not simple 8x8- or 8x16-pixel images. In fact, the player is composed of approximately 7 individual 8x16 sprites at any given time. This is true for most of the entities, too. This concept is called a “metasprite”, very similar to the term “metatile” in Part 3. That is, a “metasprite” is a larger logical sprite composed of many individual hardware sprites. This creative concept dates back to at least the NES days. If our goal is to dump human-friendly sprite sheets, we must first understand how this game represents its metasprites data.
Bugs Bunny Composed Metasprite
During my time disassembling all of the entity behavior functions, I learned that they are also responsible for loading the metasprites for each animation frame. I also learned that this game uses two different methods for loading metasprites.
Static - metasprites are composed of tiles that are in static level graphics.
Dynamic - metasprites are composed of tiles dynamically loaded into video RAM during the hardware VBlank period.
The dynamic strategy is limited by the size of a small set of reserved tiles in VRAM–roughly 50. This is why there is usually only one or two entities on-screen at any given time during gameplay. The player’s metasprite also uses the dynamic strategy and has its own reserved set of VRAM tiles.
Dynamic metasprites are defined as a list of “slices” with local offsets around an origin, which is the logical center of the full metasprite. Most entities can be flipped horizontally on-screen, so a mirrored x coordinate is also present in each slice’s definition. After defining macros for this data, we are left with nice definitions like the following:
The cannon entity’s first metasprite contains 6 slices (and it uses GB palette 1 and GBC palette 1). Using this information, we should be able to recreate the original sprites by placing the individual slices onto a canvas in the correct locations, just like the game does. Once we have recreated the original sprites, we should be able to have a custom build tool split out the individual slices so that the resulting tiles are identical to the tiles present in the final ROM.
I was wondering if VD-dev, the original developers, used an automated tool to build these metasprites. After all, this was a common strategy in that era, so perhaps there was some common tooling that many game studios used, just like the RNC compression tool from Part 2. After scouring the internet and asking in the #gbdev Discord server, I couldn’t find any answers. Since VD-dev is still alive and well these days, I emailed them directly praying that someone was still around from 20 years ago. To my delight, one of the founders, Guillaume Dubail, responded and informed me that constructing the metasprites was a manual process.
It’s a manual process, we had a tool, but it was only used to create the binary files for our Gameboy engine.
The bottom image was created by hand with Deluxe Paint or ProMotion (the tool automatically removes duplicates)
If we had to do it today, we would run an automatic program with the ability to do touch-ups by hand.
Best Regards, Guillaume
So, we’ll have to roll up our sleeves and roll our own solution. Constructing the original metasprites is easy because we simply need to draw each slice in the correct position on a canvas. We have this information explicitly laid out in the form of the dynamic_sprite macro explained above. The harder part is going to be extracting the individual slices from the original metasprite image. This is because the data in the original ROM was constructed by hand, and as a result, there are many inconsistencies in the way the slices were created.
We will need to invent our own specification format, or domain specific language, to facilitate the slice extraction. The spec is relatively simple. It will be a file containing a list of metasprite, each of which has zero or more slices, palette info, sprite origin, and horizontal mirror coordinate, and some non-important supporting commands to address the inconsistencies with the way the original data was hand-crafted. For example, this would define two metasprites from a single sprite sheet image, each of which has two slices.
After applying this process to all of the entity metasprites in the game, we end up with some cool sprite sheets that perfectly compile back into the original ROM.
Cannon Sprite Sheet
Daffy Duck Sprite Sheet
Marvin Martian Sprite Sheet
Bugs Bunny Pushing Sprite Sheet
Create New Power Up Carrot Entity
We have all the tools we need to add our own custom entity to the game. Let’s create a new carrot entity that restores the player’s health, since that sounds simple enough. First, we’ll create a very high-quality metasprite in our favorite image editor. (I may not be the best artist.)
Now, we create an entity macro for the health carrot. It needs x and y coordinates, and one byte to mark whether or not it’s been consumed by the player.
; \1: x pixel coord
; \2: y pixel coord
entity_health_carrot: MACRO
	dw HandleHealthCarrotEntity
	dw \2, \1
	db 0
	ENDM
Then, we write the HandleHealthCarrotEntity function. It needs to check for a collision with the player. If the player collides with it, restore the player’s health to full, and mark it as destroyed so that it’s no longer drawn on-screen.
HandleHealthCarrotEntity:
	ld a, [hli] ; Load the x and y coordinates
	ld e, a
	ld a, [hli]
	ld d, a
	ld a, [hli]
	ld c, a
	ld a, [hli]
	ld b, a
	ld a, [hl]
	and a
	jr nz, .exit ; exit early if the player already consumed it
	push hl      ; check for player collision
	ld hl, $fffc
	add hl, de
	ld a, [hPlayerYPos]
	sub l
	ld a, [hPlayerYPos + 1]
	sbc h
	jr nz, .noCollision
	ld a, [hPlayerYPos]
	sub l
	cp $22
	jr nc, .noCollision
	ld a, [$ffdd]
	sub c
	ld a, [$ffde]
	sbc b
	jr nz, .noCollision
	ld a, [$ffdd]
	sub c
	cp $28
	jr nc, .noCollision
	ld a, [$ffb6]
	and a
	jr nz, .noCollision
	ld a, [hMaxHealth]  ; restore health
	ld [hCurHealth], a
	pop hl
	set 0, [hl] ; mark it as consumed
	push hl
.noCollision
	pop hl
	ld bc, HealthCarrotSprite0 + 1
	call Func_792d ; dynamically load the metasprite
.exit
	jp ExitEntityHandler
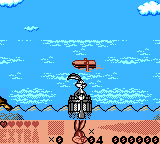
Finally, we replace the cannon entity with our new “Health Carrot” entity in the level’s entity list.
Now, let’s compile the ROM and test it out in-game! When the player collides with it, the player should be restored to full health, and the health carrot should disappear.
Health Carrot Demo
As ugly as it might be, it worked flawlessly!
Conclusion
In this post, we reverse engineered everything about level entities. We now know how they all function because their code is dumped, and we also converted their sprites into human-friendly sprite sheets. We even learned that the original developers hand crafted the metasprite definitions, which may have been quite a tedious process. Luckily, we could automate the process using their past hard work. The disassembly is really shaping up now. There are a couple important game systems that haven’t been touched, yet: music and text. We’ll be visiting one of those two next time.