Introduction
This is part 3 of a blog series where I reverse engineer a Game Boy Color game titled Looney Tunes: Carrot Crazy. It’s a rather obscure game, but I quite enjoyed it when I was a kid. For each part in this series, I will set a goal and document the steps I took to achieve that goal. An example of a goal might be to make Bugs Bunny jump twice as high. I use the trusty BGB Game Boy emulator for a lot of my work, since it has a robust debugger and memory viewer. I’ll be building up a disassembly of the game as the series goes on.
Looney Tunes: Carrot Crazy is a simple platformer. The player controls Bugs Bunny and Lola Bunny to traverse the 2D levels, while collecting carrots and other things. The first two stages in each level are similar, but the third is always a side-scroller where the boss character chases the player.
GitHub Link: https://github.com/huderlem/carrotcrazy
Goal
Dump full images of all levels in the game. As a bonus, we’ll add a custom level to the game.
I’m curious what each of the levels looks like in its entirety, so the full-size images will be fun to look at. Sometimes there are Easter eggs or inaccessible areas–maybe we’ll get lucky. Adding a custom level will be a challenge because it means we have to first understand the data structures that define the levels.
Method
First, we need to determine how all aspects of level data are loaded by the engine. Tile graphics, metatiles, and the level map data structures must be studied and dumped into their respective files. Many games from this era use the concept of a “metatile” to represent the levels in a more space-efficient manner, so I’ll be on the lookout out for that pattern. Once all of the level-related files have been dumped, we can write our own program that will produce full images of the levels. At that point, we’ll know exactly how to construct and write our own level files, so we’ll create a map editor to import custom levels into the game.
Understanding the Level Data Structures
After cracking the graphics compression in Part 2, the disassembly was still in a pretty bare state. A small bit of the engine code was disassembled, but not nearly enough to efficiently learn more about the engine and level-loading system. So, the next step is to disassemble a significant amount of the engine code.
Taking a step back, what does it mean exactly to disassemble engine code? To start, we have to include large chunks of the ROM directly into our build target. Those large binary chunks are composed of code and data. When we disassemble those raw chunks from the ROM, that is when we transform the representation into actual code or structured data. Here’s an example of a function being disassembled:
Our code originally looks like this because it’s directly including raw data from the base ROM starting at address $1A.
INCBIN "baserom.gbc", $1A, $27 - $1A
After we disassemble this binary chunk, we get the following code. (Of course, I’ve documented this routine. Our disassembler doesn’t magically know this is the “Add Score” routine.)
AddScore: ; address $1a
	ld a, [hScore]
	add c
	daa
	ld [hScore], a
	ld a, [hScore + 1]
	adc b
	daa
	ld [hScore + 1], a
	ret
We’ll repeat this strategy until the majority of the engine code is disassembled. One major benefit of disassembling one function at a time, rather than disassembling the entire ROM in one swoop, is that I’m forced to read every single function I run across. This means that it’s easy to gain a holistic understanding of how the game’s engine works.
After much disassembling, we stumble across this block of code.
	ld a, [hGameBoyColorDetection]
	cp GBC_MODE
	ld hl, ScreenDataPointers
	jr nz, .load
	ld hl, ScreenDataPointers_GBC
.load
	add hl, bc
	ld a, Bank(ScreenDataPointers)
	ld [MBC5RomBank], a
	ld a, [hli]
	ld h, [hl]
	ld l, a
	or h
	jp z, Start_
	call LoadData
This is responsible for loading a table of data, which is different for Game Boy and Game Boy Color systems. By using the BGB debugger, it’s clear that this code is called once every time a new screen is entered. I already knew that the game engine segments logic into individual “screens”, and this function is responsible for decompressing and loading the data used by each screen. The next logical step is to disassemble the data in the ScreenDataPointers table, since that will hold all of the data used by each screen. The pointer table looks like this:
ScreenDataPointers:
	dw $ffff
	dw ScreenData_InfogramesCopyright     ; SCREEN_COPYRIGHT_INFOGRAMES
	dw ScreenData_WarnerBrosCopyright     ; SCREEN_COPYRIGHT_WARNER_BROS
	dw ScreenData_LanguageSelect          ; SCREEN_LANGUAGE_SELECT
	dw ScreenData_Titlescreen             ; SCREEN_TITLESCREEN
	; and so on...
So, each screen has its own pointer to a data table processed by the LoadData routine–this is the one that decompresses arbitrary data. We already know the format for that data table, since we reverse engineered it in Part 2 of this blog series. Disassembling the copyright screen’s data yields the following:
ScreenData_InfogramesCopyright:
	compressed_data InfogramesCopyrightTiles,   $9550
	compressed_data InfogramesCopyrightTilemap, $9800
	db $ff ; terminator
	dw RunInfogramesCopyrightScreen
LoadData loads compressed data until it encounters a $ff terminator byte. Then, the final entry of the table is a handler function which is executed immediately. Now that we know what the structure of these data tables is, we can disassemble the data for every screen. After repeating this process for all screens, we end up with a nice collections of graphics and level data.
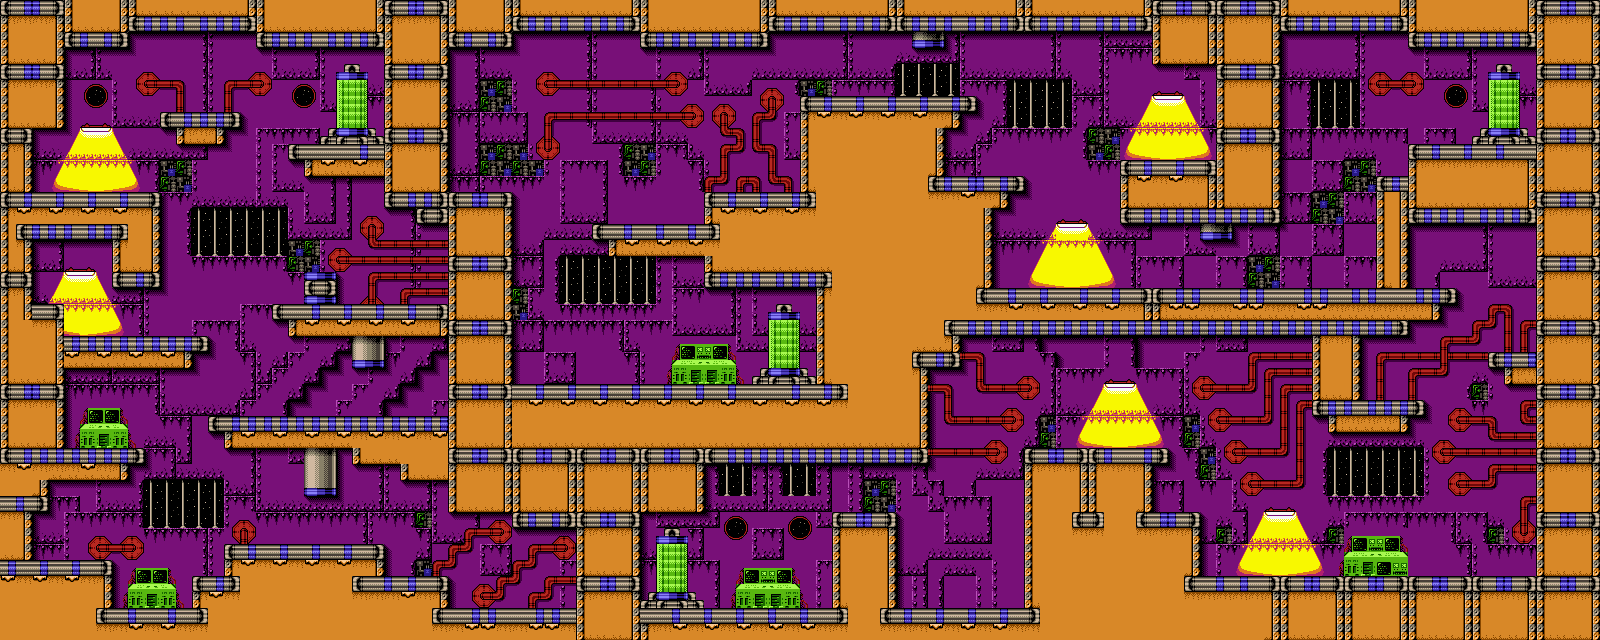
Treasure Island Tile Graphics
Here’s what the first level in the game looks like:
ScreenData_TreasureIsland1:
	compressed_data TreasureIslandLevelTiles, $8B20
	compressed_data TreasureIslandMetatiles, $C000
	compressed_data TreasureIslandCollisionAttributes, $C400
	compressed_data TreasureIsland1Map, $C600
	compressed_data SharedLevelInterfaceTiles, $8340
	compressed_data TreasureIslandLevelSpriteTiles, $8560
	db $ff
	dw RunLevelScreen
But wait, how did we determine which data is “metatiles”, “collision attributes”, and such? At first, we didn’t know this. All we knew was that some data was loaded into addresses $C000, $C400, and $C600. This is the case for every single level in the game, and the other compressed data are graphics tiles. Therefore, these unknown pieces of data are almost certainly some kind of level data. To determine what the data is, we can use an old trick with the BGB debugger.
The BGB debugger allows you to change values in RAM at any time, so we’ll change some bytes and see what happens in-game! Let’s load up the game and mess around with values after $C000. I filled in the value $A0 from address range $C000-$C010, and noticed an obvious visual change in the level.
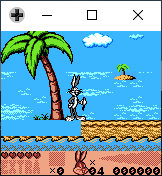
Modifying Data at $C000
Bugs bunny shouldn’t be floating on a blue rectangle, so our RAM modification must have been related to something about the level definition. After inspecting the value of those blue tiles in Video RAM, we observe that they are tile id $A0, which is the same value we manually set in RAM. After fiddling around more with values in that RAM area, it’s easy to come to conclusion that RAM location $C000 holds metatile definitions. That is, the actual level map is not composed of raw 8x8-pixel tiles, but 2x2-tile metatiles instead. Using metatiles is more space-efficient because it represents 4 tiles using a single byte in the level map. This technique is used by many retro games for this reason.
Using the same technique for address $C400 reveals that it holds collision attributes for each metatile. We’ll hopefully revisit collision attributes in a future blog post, but it’s not important for now.
Last is address $C600. We haven’t found the data that actually defines the level map, or which metatiles go where on screen. Therefore, it’s very likely $C600 holds that kind of data. Sure enough, the same RAM-modification strategy helps us confirm that hypothesis. Here, we see that I’ve manually changed the level map at top of the tree.
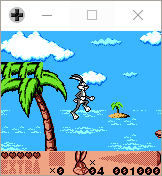
Modifying the Level Map
However, this is no ordinary level map data structure. Typically, games like this use a simple 2D array of metatiles to define the level map. However, this game has another level of abstraction, which I call “blocks”. A block is a 4x4 set of metatiles, and the level map is a 2D grid of blocks. The levels in this game are rather large, and they use many repeated blocks in the sky areas of the levels. This fact shrinks the size of the level data and allows it to fit inside RAM with ease.
To recap:
- Levels have a set of tile graphics defined.
- Levels define “metatiles”, which are made up of 4 individual tiles.
- Every metatile has a collision attribute associated with it.
- Levels define “blocks”, which are made up of 16 individual metatiles.
- Level maps are defined as a 2D grid of blocks.
Now that we’ve dumped and understand the level data structures, we should be able to write our own program to dump full images of the levels.
Dump Full Level Images
This process is fairly straightforward, since we know the data structure formats. The only problem is that the level palettes are a part of the screen data table above. Rather than tracking down the palettes in the ROM file, I simply copied the palette values from the BGB Video RAM viewer for each level.
The level image dumper program can be found here: https://gist.github.com/huderlem/a5c4f66969ab57a0dc0f71de4e321297
The results turned out very nicely! I only included Game Boy Color images below, for brevity.
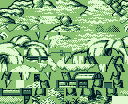
Treasure Island


Crazy Town


Taz’s Zoo


Space Station
Elmer Fudd’s Forest


Insert Custom Level
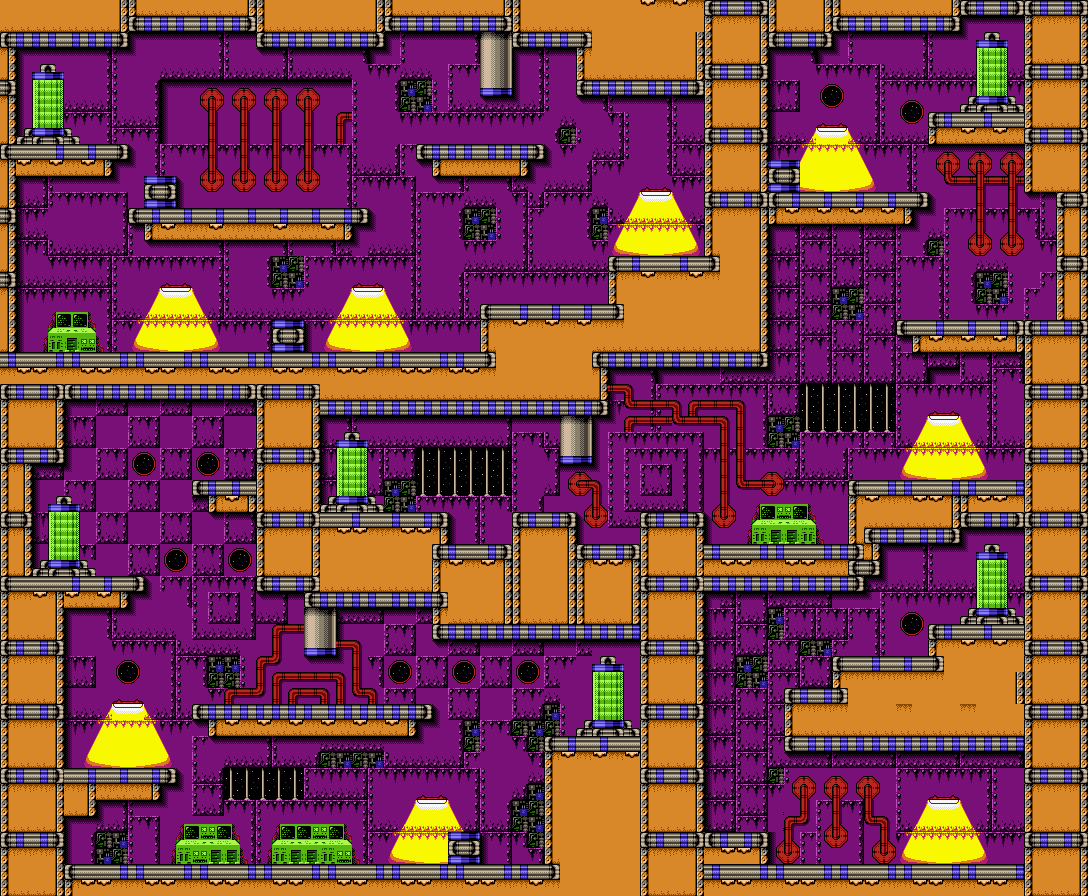
Now that we’ve dumped images of the levels, we’ve proved that we have a full understanding of how level maps work. This means we should also be able to add our own custom levels into the game. I whipped up a crude map editor using Qt. It borrows a lot of code from my Pokémon map editor, called Porymap.
The map editor displays the loaded map in the left pane, and the right pane allows the user to select metatiles to paint onto the map canvas. The user can also select groups of metatiles straight from the map area for convenience. Saving the map will produce a .vdmap file, which is the block-based level map. (I named it .vdmap because VD-Dev is the name of the studio that created this game.)

Carrot Patch Map Editor
When saving a .vdmap file, it makes sure to detect shared blocks in the level, to ensure we’re getting as much compression as possible. The final step is to add the map to the game. We can do this simply by adding our custom level data to some free space at the end of the ROM. As you can see in the image above, I’ve added some suspicious ground blocks in the air at the start of the level. Let’s fire it up in-game to see if it worked.
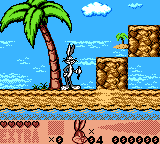
Custom Level Gameplay
It worked! It’s not a good level, and it doesn’t use custom graphics, but it’s certainly a great start that we can be excited about.
Conclusion
In this post, we reverse engineered the level map format. We dumped full level images, and we even inserted our own custom level into the game. The disassembly project itself is shaping up nicely, and most of the graphics and level data has been completely dumped at this point. The next logical step with respect to level editing will be to reverse engineer how the level entities work. We’ll want to be able to place carrots and enemies in the levels accordingly, and that system is still a mystery. We’ll dive into that topic later in this series.
Thanks for reading.