Introduction
This is part 2 of a blog series where I reverse engineer a Game Boy Color game titled Looney Tunes: Carrot Crazy. It’s a rather obscure game, but I quite enjoyed it when I was a kid. For each part in this series, I will set a goal and document the steps I took to achieve that goal. I’ll be building up a disassembly of the game as the series goes on.
GitHub Link: https://github.com/huderlem/carrotcrazy
Goal
Build a decompressor and compressor in order to modify the game’s graphics. Ideally, we will perfectly replicate the original compression method.
Many games use compression to reduce the size of graphics stored in ROM. One 8x8-pixel tile is 16 bytes, so that can add up quickly if not using compression. Of course, this makes editing and inserting custom graphics into the game more difficult. Without knowing how the compression and decompression works, we won’t be able to insert our graphics data in a format the game engine understands!
How do I know this game uses compression? I viewed the entire ROM as a 2bpp image, which is essentially a raw view of all uncompressed graphics. I spotted some uncompressed graphics data, such as variuos sprites and UI elements. However, lots of data was not visible, such as the level and title screen graphics.
Method
First, we will locate the decompression routine in the ROM. Note, the compression routine won’t exist in the game because graphics are compressed when the game is built, not during gameplay. Once the decompression routine is located, it needs to be examined and documented so that its algorithm is understood. Finally, we’ll develop a compression algorithm that is compatible with the decompression algorithm. After implementing our compression algorithm, we should have a compression tool that allows us to insert custom graphics into the game.
Locate the Decompression Routine
Locating the decompression routine is fairly straightforward using the BGB debugger. Starting at the Infogrames copyright screen, I can see that tile data is loaded into Video RAM (VRAM) at address $9550.
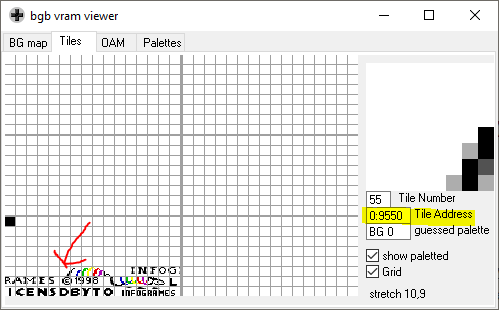
Tile Data Loaded in VRAM
We know that the uncompressed data is being loaded into that address, therefore, we can place an access breakpoint at address $9550. This will cause the debugger to pause code exeuction when a value is written to address $9550. I expect the code responsible for loading that value to be in the decompression routine, or directly after.
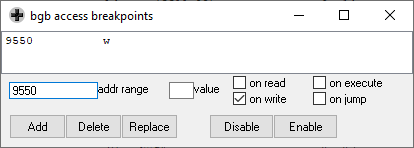
Defining the Access Breakpoint
After reloading the ROM, the breakpoint triggers immediately at address $01:7E3E. However, this is not what we’re looking for, since the code here is simply looping over a large address range and writing $00 to every address. This is just the code responsible for clearning RAM and VRAM at game startup.
After continuing code execution, the breakpoint triggers again at address $00:3FA2. This seems more likely to be the decompression routine because it’s located in ROM bank 0, which is where frequently-used library code tends to live. By stepping through the code quickly, I can see that the tile data is appearing in the BGB VRAM viewer, so this is definitely part of the decompression routine! To find where the routine begins, we can look at the call stack to get an idea of where the last routine was called and pushed onto the stack.
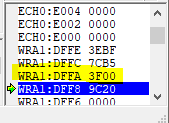
Call Stack
We see that address $3F00 was previously pushed onto the stack, and that is located near our breakpointed address $00:3FA2. The code around that address is the following:
    ld a, [$ff8a]
    ld [MBC5RomBank], a
    push hl
    call Func_3F03
    pop hl ; this is address $00:3F00
    jr .asm_3ECA

Func_3F03:
    ld hl, 18 ; skip over 18 bytes
    add hl, bc
    scf
    ld a, [hli]
    adc a
    add a
    jp asm_3F9D ; jump into the main decompression logic
Bingo, this is the entry-point code responsible for initiating the decompression. To confirm, I observed that Func_3F03 is called exactly once every time a new set of graphics is loaded into VRAM. Register bc contains a pointer to the compressed data, and register de contains the destination address for the decompressed data.
What’s interesting is that there are 18 unused bytes at the start of every piece of compressed data. More on that later.
Document the Decompression Routine
What does it mean to “document the decompression routine”? For my purposes, it means that we completely understand the algorithm. Without that, building a valid compressor that takes advantage of all the decompression capabilities won’t be feasible. To start, I simply stepped through the code instruction by instruction. This gave me a feel for the general flow. Usually decompression algorithms work by interpreting a stream of commands mixed in with raw data. A command might be “load the next 4 immediate bytes” or “copy 3 bytes that were previously decompressed”.
After staring at the code for awhile, I determined that this decompression algorithm uses a command bitstream interspersed with raw uncompressed data. To enumerate the possible commands, I figured it would be simplest to translate the Game Boy code to a Go program and see if I could build my own decompressor. This would make it easier to reason about the encoded commands. You can see the result of that program in this Gist.
By analyzing the translated Go code, we can see that there are three different supported commands.
- Load one immediate byte
- Load
nbytes at offsetmin the decompressed data stream. - Load
kpairs of immediate bytes. (I call these pairs “rows”.)
The command bitstream encodes values n, m, and k in a clever way. It’s similar to a Huffman dictionary since the common values are encoded with fewer bits than the uncommon values. By manually tracing all possible code paths, I was able to determine the encoding table for the command bitstream. These were my notes:
n encoding:
0x2: 1 0 (can't use long offset)
0x3: 1 1 0
0x4: 0 0 0
0x5: 0 1 0
0x6: 0 0 1 0
0x7: 0 0 1 1
0x8: 0 1 1 0

arbitrary numBytes (+8):
1 1 1

k encoding:
0x9: 0 1 1 1
followed by 4-bit number k to use for ((k + 3) * 2) rows

m encoding (hi byte. lo byte is an immediate value):
0x0 - 0
0x1 - 1 1 0
0x2 - 1 0 0 0
0x3 - 1 0 0 1
0x4 - 1 0 1 0 1
0x5 - 1 0 1 1 1
0x6 - 1 1 1 0 1
0x7 - 1 1 1 1 1
0x8 - 1 0 1 0 0 0
0x9 - 1 0 1 0 0 1
0xA - 1 0 1 1 0 0
0xB - 1 0 1 1 0 1
0xC - 1 1 1 0 0 0
0xD - 1 1 1 0 0 1
0xE - 1 1 1 1 0 0
0xF - 1 1 1 1 0 1
Now that the commands for the compression were fully understood, I could start building the actual compression algorithm that uses those commands. Looking closer at the 3 commands, there are really only two conceptually different commands.
- Load some immediate bytes.
- Load some bytes that were previously decompressed.
If you’re familiar with compression algorithms, then you might notice that this is exactly how the LZ family of compression techniques works. I implemented my own version of the LZ77 algorithm and made sure to encode the commands as specified above. After much fiddling, I ended up with a functional implementation. To test my compression, I modified the copyright screen graphics and ran the file through my compressor and overwrote the original data in the ROM after the 18-byte header. Bingo, it worked! (In case it isn’t obvious in the image below, I change the name to “SHANTYTOWN”.)
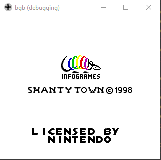
Custom Compressed Graphics
At this point, we’ve accomplished our initial goal of building a compressor so that we can insert our own custom compressed graphics. However, my compressor does not produce identical output to whatever original compressor was used by the game developers. It’s close, but there is some extra tweaking that I was unable to reproduce.
Replicating the Original Compression & Unearthing History
To replicate the original compression, I figured I might have to learn more about the history of the game and see if there is any documentation lying around the internet. The developer that created Carrot Crazy is a company named VD-dev, and they authored seven Game Boy Color games.
I figured they probably used the same compression techniques across their games. Perhaps they used the same compression used by other studios, too. I picked out a sequence of bytes from the decompression routine and searched for it across the entire library of Game Boy games.
Looney Tunes - Carrot Crazy
Lucky Luke
The Smurfs Nightmare
Supercross Freestyle
Test Drive Le Mans
V-Rally - Championship Edition
V-Rally - Edition 99
Wacky Races
To my dismay, these are all VD-dev games. This seemed to indicate that the compression technique was an in-house tool. I couldn’t find any archived documentation regarding VD-dev Game Boy development that would help me match the compression.
At this point, I decided to revisit the 18 unused bytes that preceded every chunk of compressed data. It’s wasteful to include those 18 bytes when they are never used. However, we can guess that these 18 bytes are some sort of header attached to the compressed data payload. After inspecting multiple 18-byte headers for different compressed data chunks, I noticed the following properties of the header.
- First four bytes are always
0x52, 0x4E, 0x43, 0x02. (“RNC” 2 in ASCII.) - Second four bytes are the length of the decompressed data.
- Third four bytes are the length of the compressed data.
- Remaining bytes are seemingly random. Maybe a checksum.
I figured the first four bytes were a signature, since that’s a common way to indicate file types. I Googled "52 4E 43 02" to see if this was a known signature, and to my surprise, it was listed in Wikipedia’s list of file signatures page–Jackpot!
This compression technique is well-known and used for many games in the SNES and Game Boy era, and it’s called Rob Northen compression, or “RNC”. To my absolute delight, the RNC algorithm is fully documented and my personal notes from earlier matched perfectly.
A general-purpose data compression tool called RNC ProPack was created back in the 1990’s by Rob Northen Computing. It was made freely available in 1999 and was used by many Game Boy developers. I scanned the Game Boy library for the “RNC” signature to see which games were using this compression technique. Exactly 111 games use RNC compression–not too shabby!
The final test was to run the RNC ProPack tool on the Carrot Crazy graphics to see if we could achieve identical compression. Sure enough, everything matched perfectly. This confirms that VD-dev used RNC ProPack to generate all of the compressed data in their Game Boy games.
Conclusion
That concludes part 2 of the series. When reverse engineering and disassembling games, I like to dump graphics data early on in the process. This sets us up nicely to edit custom levels and character sprites in the future. At this point, I’ve integrated a decompiled version of the RNC ProPack tool into the build process for the Carrot Crazy disassembly. This means inserting compressed graphics into the game is trivial.
Thanks for reading.